Creating reproducible environments using pip, renv, Docker and Code Ocean
In modern research practice, it is commonplace to share code and data freely. Doing so allows others to examine and test their own scientific theories without incurring the time and monetary costs of collecting data (which is particularly useful for larger datasets). Importantly, sharing code and data also allows for the results to be interrogated more thoroughly and accurately. If researcher X reports a particular finding, then researcher Y can test whether this finding is true by re-producing the analysis themselves. In doing so, others can also test alternative analyses or statistical techniques on the same research question.
To share code and data openly to this end requires an element of reproducibility - a means by which an identical environment to the original researcher can be recreated. However, this is not as straightforward as it may initially seem, as reprodcibility spans several elements. Firstly, one must consider the software and macro-scale components of research. Programming languages such as Stan, R and Python are constantly being updated, as are software like RStudio. Different versions of software can ultimately impede reproducibility.
Managing package versions in Python using pip
Also constantly updating, are the specific packages and tools used within these environments. Bugs need to be fixed, improvements made and features added. Given the constantly evolving state of packages and software, you can see how versioning is a particularly useful feature of any research project.
There exist several useful features and tools for version controlling your software packages. For predominantly Python-based projects, a virtual environment venv is commonly used.
You can create a new virtual environment by running:
python -m venv myenv
And then activating that environment (on Mac) by running:
source myenv/bin/activate
You can then install packages using the pip command:
pip install pandas numpy
And save the list of installed packages to a requirements.txt file:
pip freeze > requirements.txt
This is particularly important - and is where the idea of reproducibility arrives - as others can install the list of Python packages used by someone else by running a simple command:
pip install -r requirements.txt
Which will install the python packages listed e.g.,
ipykernel>=6.0.0
jupyter>=1.0.0
jupyter-client>=7.0.0
nbformat>=5.0.0
notebook>=6.0.0
nbconvert>=6.0.0
Within this file, you can specify a certain version (as I have done above); leaving it blank will install the latest.
Another somewhat relevant and useful command is one which lists both the current version of a package installed on your environment, as well as the version history of that package more generally.
To do this, run the command:
pip index versions <package>
For example, typing:
pip index versions numpy
gives the following output:
❯ pip index versions numpy
WARNING: pip index is currently an experimental command. It may be removed/changed in a future release without prior warning.
numpy (2.2.2)
Available versions: 2.2.2, 2.2.1, 2.2.0, 2.1.3, 2.1.2, 2.1.1, 2.1.0, 2.0.2, 2.0.1, 2.0.0, 1.26.4, 1.26.3, 1.26.2, 1.26.1, 1.26.0, 1.25.2, 1.25.1, 1.25.0, 1.24.4, 1.24.3, 1.24.2, 1.24.1, 1.24.0, 1.23.5, 1.23.4, 1.23.3, 1.23.2, 1.23.1, 1.23.0, 1.22.4, 1.22.3, 1.22.2, 1.22.1, 1.22.0, 1.21.1, 1.21.0, 1.20.3, 1.20.2, 1.20.1, 1.20.0, 1.19.5, 1.19.4, 1.19.3, 1.19.2, 1.19.1, 1.19.0, 1.18.5, 1.18.4, 1.18.3, 1.18.2, 1.18.1, 1.18.0, 1.17.5, 1.17.4, 1.17.3, 1.17.2, 1.17.1, 1.17.0, 1.16.6, 1.16.5, 1.16.4, 1.16.3, 1.16.2, 1.16.1, 1.16.0, 1.15.4, 1.15.3, 1.15.2, 1.15.1, 1.15.0, 1.14.6, 1.14.5, 1.14.4, 1.14.3, 1.14.2, 1.14.1, 1.14.0, 1.13.3, 1.13.1, 1.13.0, 1.12.1, 1.12.0, 1.11.3, 1.11.2, 1.11.1, 1.11.0, 1.10.4, 1.10.2, 1.10.1, 1.10.0.post2, 1.9.3, 1.9.2, 1.9.1, 1.9.0, 1.8.2, 1.8.1, 1.8.0, 1.7.2, 1.7.1, 1.7.0, 1.6.2, 1.6.1, 1.6.0, 1.5.1, 1.5.0, 1.4.1, 1.3.0
  INSTALLED: 1.26.4
  LATEST:    2.2.2
Which lets us know that the version of numpy currently installed in the environment (1.26.4) is not the same as the latest (2.2.2). You can also see that this is the case by typing pip list which lists all python packages in the current environment:
...
nltk                                     3.8.1
numpy                                    1.26.4
oauthlib                                 3.2.2
...
Tip: While a
virtualenvworks well for Python-only projects, using acondaenvironment is more appropriate when working with multiple programming languages (like R) or system libraries.
Reproducibility within R/RStudio projects
RStudio is very popular software used for statistical analysis. Similarly to Python, reproducibility - and issues therein - with RStudio environments exist at multiple levels. We will discuss two approaches to reproducibility in RStudio: renv for package versioning and using Docker to create a reproducible environment. We will then introduce Code Ocean, an online platform for hosting reproducible environments which make it easier for others to generate and replicate your scientific analyses.
Package versioning in R using renv
As we have seen above with pip in Python environments, packages are always being updated and you should always keep track of which versions you are using. Unfortunately there isn’t a direct equivalent of pip and virtual environments in R, however renv follows a similar principle.
Similar to virtual environments, renv provides pacakge management specific to each project, meaning each project maintains its own private package library. However, it tracks and records all package dependencies in a lockfile, creating a detailed ‘snapshot’ of a project’s environment that includes specific versions of packages and their dependencies. It can handle packages from CRAN, GitHub, Bioconductor, and local sources, making it versatile for projects that require packages from various locations.
When using renv, after installing it, you need to firstly initialize it for the current project:
renv::init()
This subsequently creates:
-
renv.lock: A specific file whcih records package versions -
renv/: A directory containing the project library -
.Rprofile: A project-specific R profile
The renv.lock file may look something like this:
{
  "R": {
    "Version": "4.1.2",
    "Repositories": [
      {
        "Name": "CRAN",
        "URL": "https://cloud.r-project.org"
      }
    ]
  },
  "Packages": {
    "dplyr": {
      "Package": "dplyr",
      "Version": "1.0.7",
      "Source": "Repository",
      "Repository": "CRAN"
    },
    "ggplot2": {
      "Package": "ggplot2",
      "Version": "3.3.5",
      "Source": "Repository",
      "Repository": "CRAN"
    }
  }
}
listing the version of R itself, as well as the packages installed within that project.
You can install packages both normally, or by using the renv::install function, but in either case, you need to update your lock file to be up to date.
There are three primary commands when using renv - snapshot(), restore(), and status() - each of which serve distinct but interconnected purposes in managing R project environments.
-
The
snapshot()command is responsible for capturing the complete state of your project’s package environment - as the name suggests, think of it like taking a picture. This information is then written to therenv.lockfile, and any changes from previous snapshots are automatically updated, ensuring the lockfile remains current with your project’s needs. -
The
restore()command functions as the complement tosnapshot(), as it rebuilds your project environment based on the information stored in the lockfile. When ran,restore()reads the renv.lock file and systematically installs all packages at their specified versions. -
The
status()command provides a comparison between your current environment and the lockfile, usefully highlighting which packages are out of sync. The command also identifies any missing packages that should be present according to the lockfile, as well as new packages that have been installed but not yet recorded.
For example, after updating some packages - but not updating your lock file - running renv.status might produce something like this:
> renv::status()
The following package(s) are out of sync:

  Package  Installed Lockfile
  dplyr    1.0.8     1.0.7
  ggplot2  3.3.6     3.3.5

Use `renv::snapshot()` to save changes to lockfile
After appropriately running renv.snapshot() and renv.restore(), this will change to:
`> renv::status()
No issues found -- the project is in a consistent state.
renv also makes it easy for others to install all of the packages listed within a specific project. For example, if hosting a repository on GitHub, one can simply download the repository, and - after opening the project - need to only run two simple commands:
-
Install
renv-install.packages("renv") -
Restore the environment -
renv::restore()
This can be made even simpler by creating a setup.R file within the project root with:
if (!require("renv")) install.packages("renv")
renv::restore()
Then all you need to do is run:
source("setup.R")
Containerizing environments using Docker
We can see that renv is particularly useful at managing R package dependencies within a project, ensuring that specific versions of packages are tracked and can be reproduced. However, renv has several limitations.
Beyond R packages, it cannot manage system-level dependencies, different versions of R itself, or dependencies outside the R ecosystem. For instance, if your project requires specific system libraries or external software, renv isn’t much use. Recall that different people may have different versions of Python - the same can be said for R and RStudio:
R.version

               _
platform       x86_64-apple-darwin20
arch           x86_64
os             darwin20
system         x86_64, darwin20
status
major          4
minor          4.1
year           2024
month          06
day            14
svn rev        86737
language       R
version.string R version 4.4.1 (2024-06-14)
nickname       Race for Your Life
RStudio.version()

$version
[1] ‘2024.12.0.467’

$long_version
[1] "2024.12.0+467"

$release_name
[1] "Kousa Dogwood"
renv also doesn’t address differences in operating systems or hardware configurations.
This is where Docker comes in. While renv operates at the package level, Docker operates at the system level, creating completely isolated environments that include everything needed to run an application - from the operating system, software and packages. Relevant to R ecosystems, Docker can package not just R and its packages, but also system libraries, external software, and even specific operating system configurations.
Docker involves two core concepts: images and containers. Docker images serve as templates that contain all the necessary components for running an application. Similar to how renv took a snapshot of the packages within R, a Docker image does the same but on a wider scale - doing so for a complete system, including the operating system, installed software, libraries, and configurations.
Docker containers are the running instances created from these images. When you start a container, Docker takes the image and adds a writable layer on top, allowing the container to modify files while keeping the underlying image unchanged. Each container runs in its own namespace with its own filesystem, network interface, and process space, ensuring that applications run consistently regardless of the host environment.
Let’s see the relationship between images and containers though an example. We will use the case for an online course that I helped to develop, BayesCog, which uses Docker containers to create a reproducible RStudio environment.
We firstly create the Docker image using a Dockerfile, the ‘recipe’ for the image where we list all of our requires software and packages. A minimalistic Dockerfile for the BayesCog repository is:
# Use specific R version
FROM rocker/rstudio:4.4.1

# Install system dependencies (these are needed for some R packages)
RUN apt-get update && apt-get install -y \
    libxml2-dev \
    libcairo2-dev \
    libgit2-dev \
    libglpk40 \
    libglu1-mesa-dev \
    libgmp3-dev \
    libgsl0-dev \
    libssl-dev \
    && apt-get clean \
    && rm -rf /var/lib/apt/lists/*

# Install R packages with specific versions (the same as in the renv.lock file)
RUN R -e "install.packages(c(\
    'renv=1.0.11', \
    'ggplot2=3.5.1', \
    'lattice=0.22-6', \
    'rmarkdown=2.29', \
    'patchwork=1.3.0', \
    'rstan=2.32.6', \
    'reshape2=1.4.4', \
    'R.matlab=3.7.0', \
    'loo=2.8.0', \
    'corrr=0.4.4' \
    ), repos='https://cloud.r-project.org/')"

WORKDIR /home/rstudio

CMD ["/init"]
Without going too much into the details, we can break this file down into specific sections:
- The first command,
FROM rocker/rstudio:4.4.1, specifies the base image to use, which in this case is RStudio with the specificR version 4.4.1 - The second block uses
RUN apt-getto install system-level dependencies that are required by various R packages. These are Linux libraries that certain R packages need to function properly. - The third block uses
RUN R -eto install specific R packages with exact versions. -
WORKDIR /home/rstudiosets the working directory. - The final line CMD [“/init”] specifies the command that should run when the container starts, which in this case launches the RStudio server
There are a few notes about this specific Dockerfile, which combat some of the technical components of reproducibility.
Firstly, we specify the creation of an RStudio server that users can interact with, separate to their own RStudio, which may be different. You don’t need to do this, but it helps maintain consistency and is useful for those without RStudio installed locally.
We also - in this version of the Dockerfile - provide specific versions for both RStudio and the R packages themselves. This has both pros and cons; whilst it increases reproducibility ensuring that the specific packages used to run an analysis are installed, it also means that the packages may become out of date in the future, with bugs and patches not being updated. It is therefore a good idea to give people the flexibility to either install the specific versions used to create the original analysis, or to install the latest versions:
# Use specific R version
FROM rocker/rstudio:4.4.1

# To use latest version instead, use:
# FROM rocker/rstudio:latest

# Install system dependencies (these are needed for some R packages)
RUN apt-get update && apt-get install -y \
    libxml2-dev \
    libcairo2-dev \
    libgit2-dev \
    libglpk40 \
    libglu1-mesa-dev \
    libgmp3-dev \
    libgsl0-dev \
    libssl-dev \
    && apt-get clean \
    && rm -rf /var/lib/apt/lists/*

# Install R packages with specific versions (the same as in the renv.lock file)
RUN R -e "install.packages(c(\
    'renv=1.0.11', \
    'ggplot2=3.5.1', \
    'lattice=0.22-6', \
    'rmarkdown=2.29', \
    'patchwork=1.3.0', \
    'rstan=2.32.6', \
    'reshape2=1.4.4', \
    'R.matlab=3.7.0', \
    'loo=2.8.0', \
    'corrr=0.4.4' \
    ), repos='https://cloud.r-project.org/')"

# To use latest package versions instead, remove the version numbers:
# RUN R -e "install.packages(c(\
#     'renv', \
#     'ggplot2', \
#     'lattice', \
#     'rmarkdown', \
#     'patchwork', \
#     'rstan', \
#     'reshape2', \
#     'R.matlab', \
#     'loo', \
#     'corrr' \
#     ), repos='https://cloud.r-project.org/')"

WORKDIR /home/rstudio

CMD ["/init"]
Docker makes it easy to build, upload, share and download images. For example, with the Dockerfile for the BayesCog repository, to create and upload the Dockerfile as a Docker image, you need to do the following:
(assuming here that I call the image bayescog and am using my Docker account called sohamir)
First build the image locally:
docker build -t bayescog .
Then tag the image with your Docker Hub username:
docker tag bayescog sohamir/bayescog
Login to Docker Hub (an online hub for uploading and sharing Docker images) and push the image:
docker login -u sohamir
docker push sohamir/bayescog
Then, if I am wanting to re-create the environment (either myself or from the perspective of others for reproducibility), in the project root, you can just run:
docker pull sohamir/bayescog_test:latest

docker run -p 8787:8787 \
  --mount type=bind,source=$(pwd),target=/home/rstudio/project \
  -e PASSWORD=your_chosen_password \
  --name bayescog_test \
  sohamir/bayescog_test
This will mount the Docker image onto the BayesCog repository. Then, navigate to http://localhost:8787/ in a browser, and type your username (which is always rstudio) and the password chosen in the command prior.
Then once RStudio has loaded, click on the project folder; the material will be there and all packages will be installed.
Sharing environments more easily using Code Ocean
While Docker containers are great for reproducibility, it isn’t the most accessible of tools - you need to install Docker and be comfortable using the command line. You also have to put in some effort in downloading the image and creating the container. Code Ocean tries to simplfy this process by moving everything to the web browser, making it much easier for researchers to share their work and for others to check their results.
Think of Code Ocean as a scientific platform that combines the best parts of containers with the simplicity of a website. Researchers can package up their code, data, and computing setup into what Code Ocean calls a “capsule” - basically everything someone would need to rerun their analysis, all in one place.
Using Code Ocean as a researcher is pretty straightforward. When you create a new project, you just tell it what you need:
- What programming language you’re using
- What packages your code needs
- Your data and code files
- How much computing power you need
This is similar to a Dockerfile, but done through a GUI on their website:
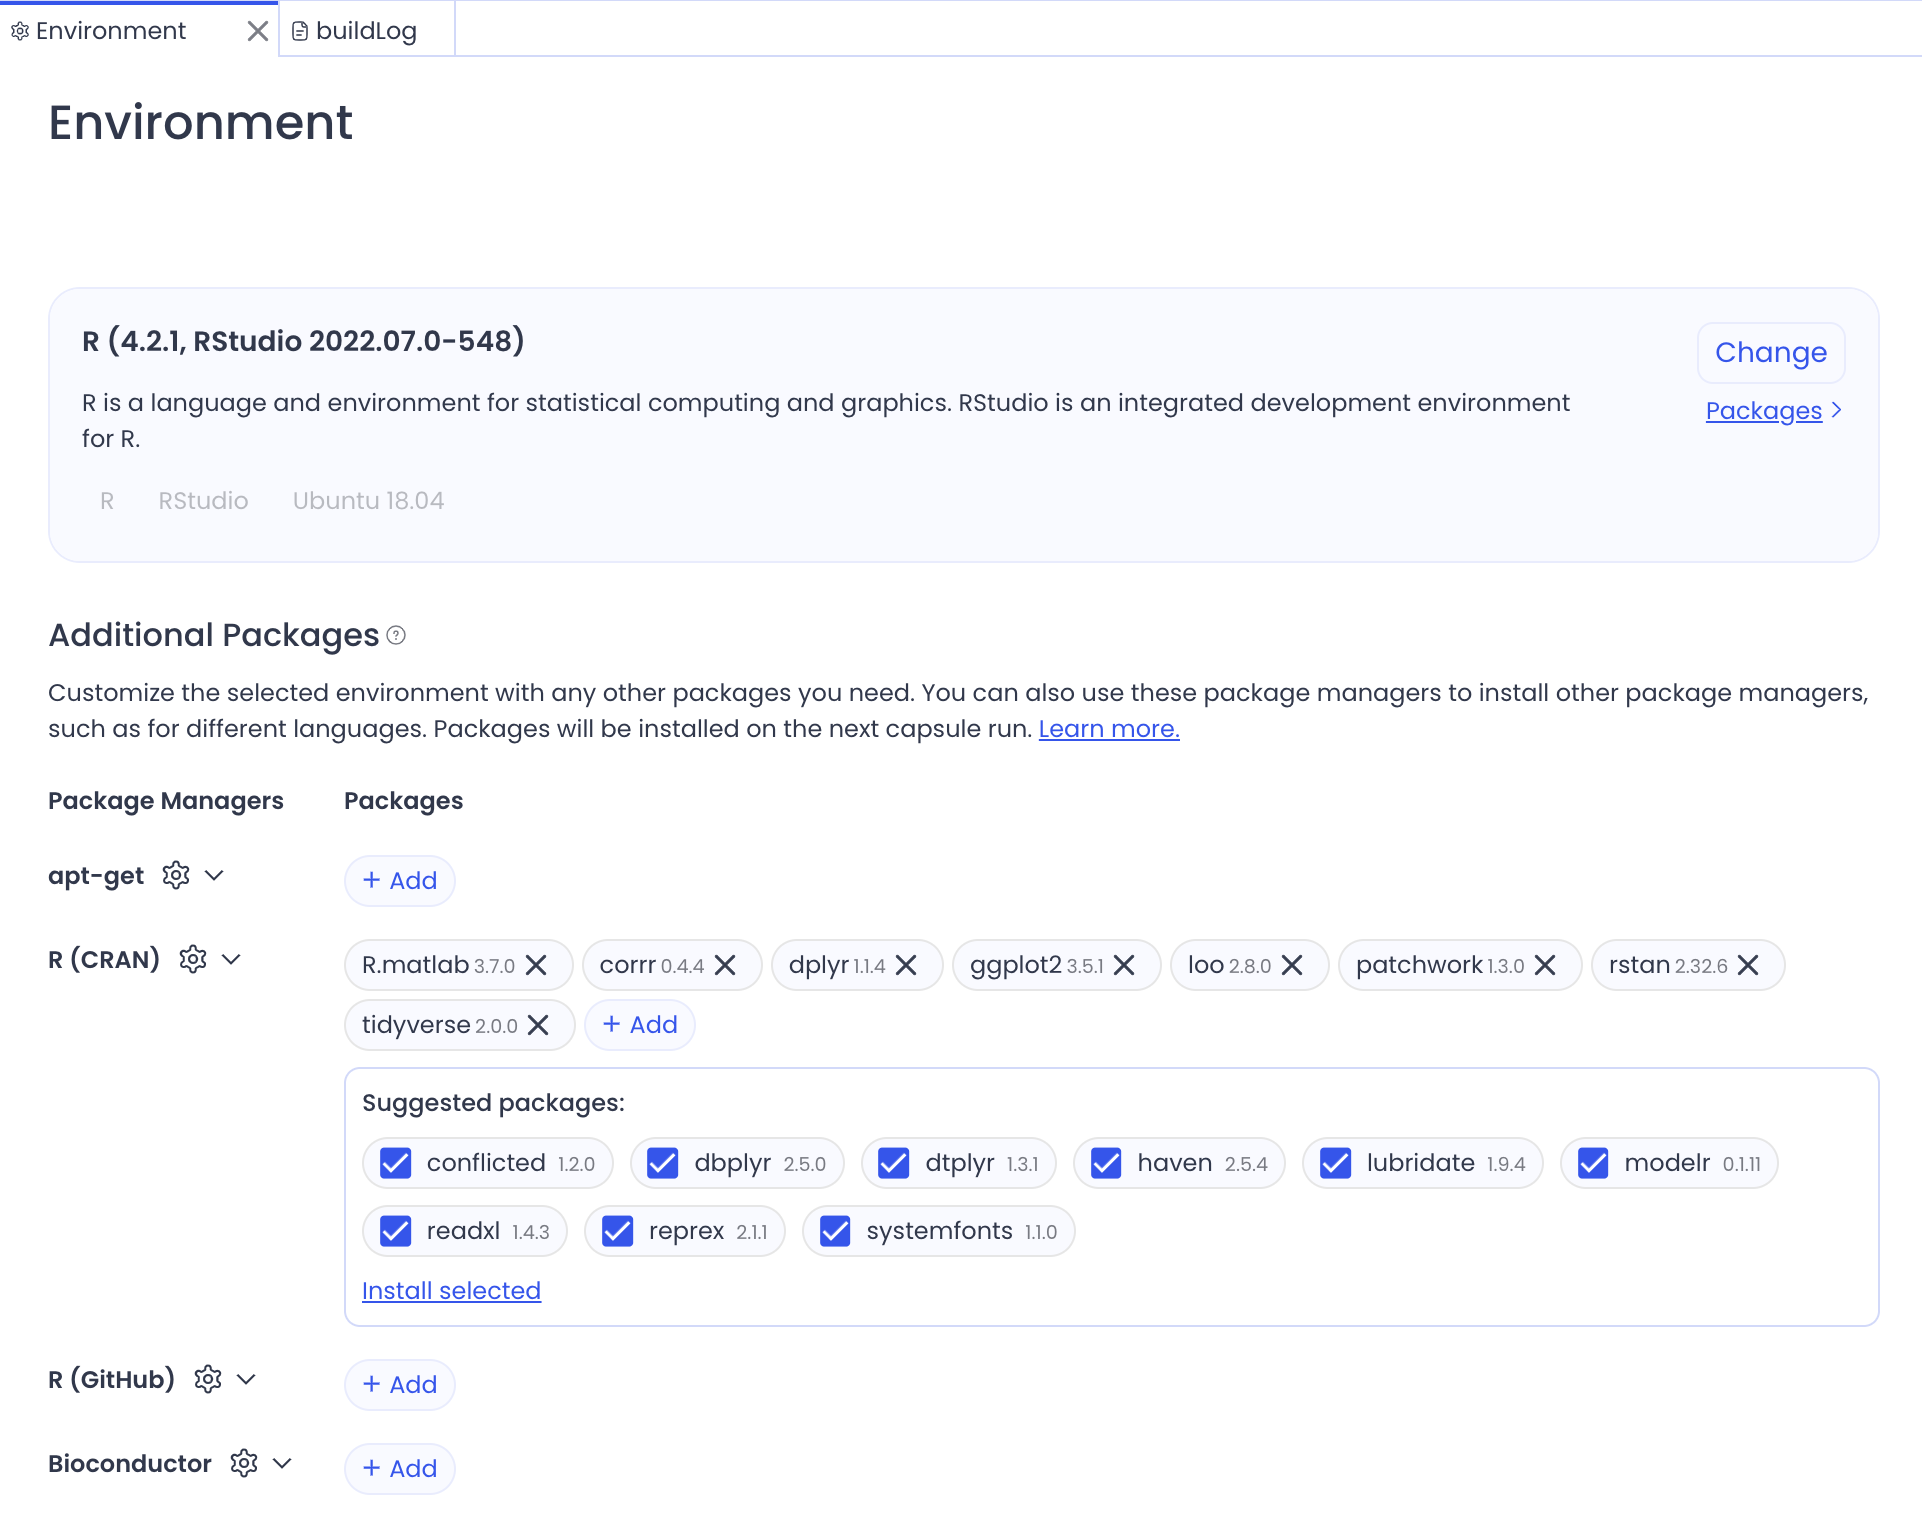
You can use Code Ocean as a cloud-based environment, but it is more appropriate for creating archives of completed analyses. However, to do this, you need to upload your repository details in a specific way:
- A main script (
main.py,run.R, etc.) that will run all of the analyses in your project folder. In other words, this is your primary script that Code Ocean will execute. It must be named appropriately for your language. - A code folder
/codecontaining all your supporting scripts and functions, or helper functions or utilities your main script needs - A data folder
/datacontaining all input data files processed by/code - A file to set-up the environment Setup - this can be specified manually (see above) or using the appropriate file in the project directory (e.g.,
renv.lock,requirements.txt)
When you are happy with your requirements and set-up, you can generate a ‘Reproducible Run’ which creates the environment in a read-only capacity.
Code Ocean then sets everything up in the cloud automatically as Docker would. Anyone can look at your work and rerun your analysis in their web browser, without installing anything on their computer.
Ultimately, Code Ocean works best as a final snapshot of your completed analyses that others can examine. It does this efficiently and with less hassle than Docker. However, it’s not really meant to be a platform where people actively work on code. If you’re teaching a class where students need to write and modify code, or if you’re actively developing software, you might want to use something else.
There’s a reason why their environments are called ‘capsules’!
Altogether, you can see how both renv and Docker can be used with GitHub to help others reproduce your specific working environment:
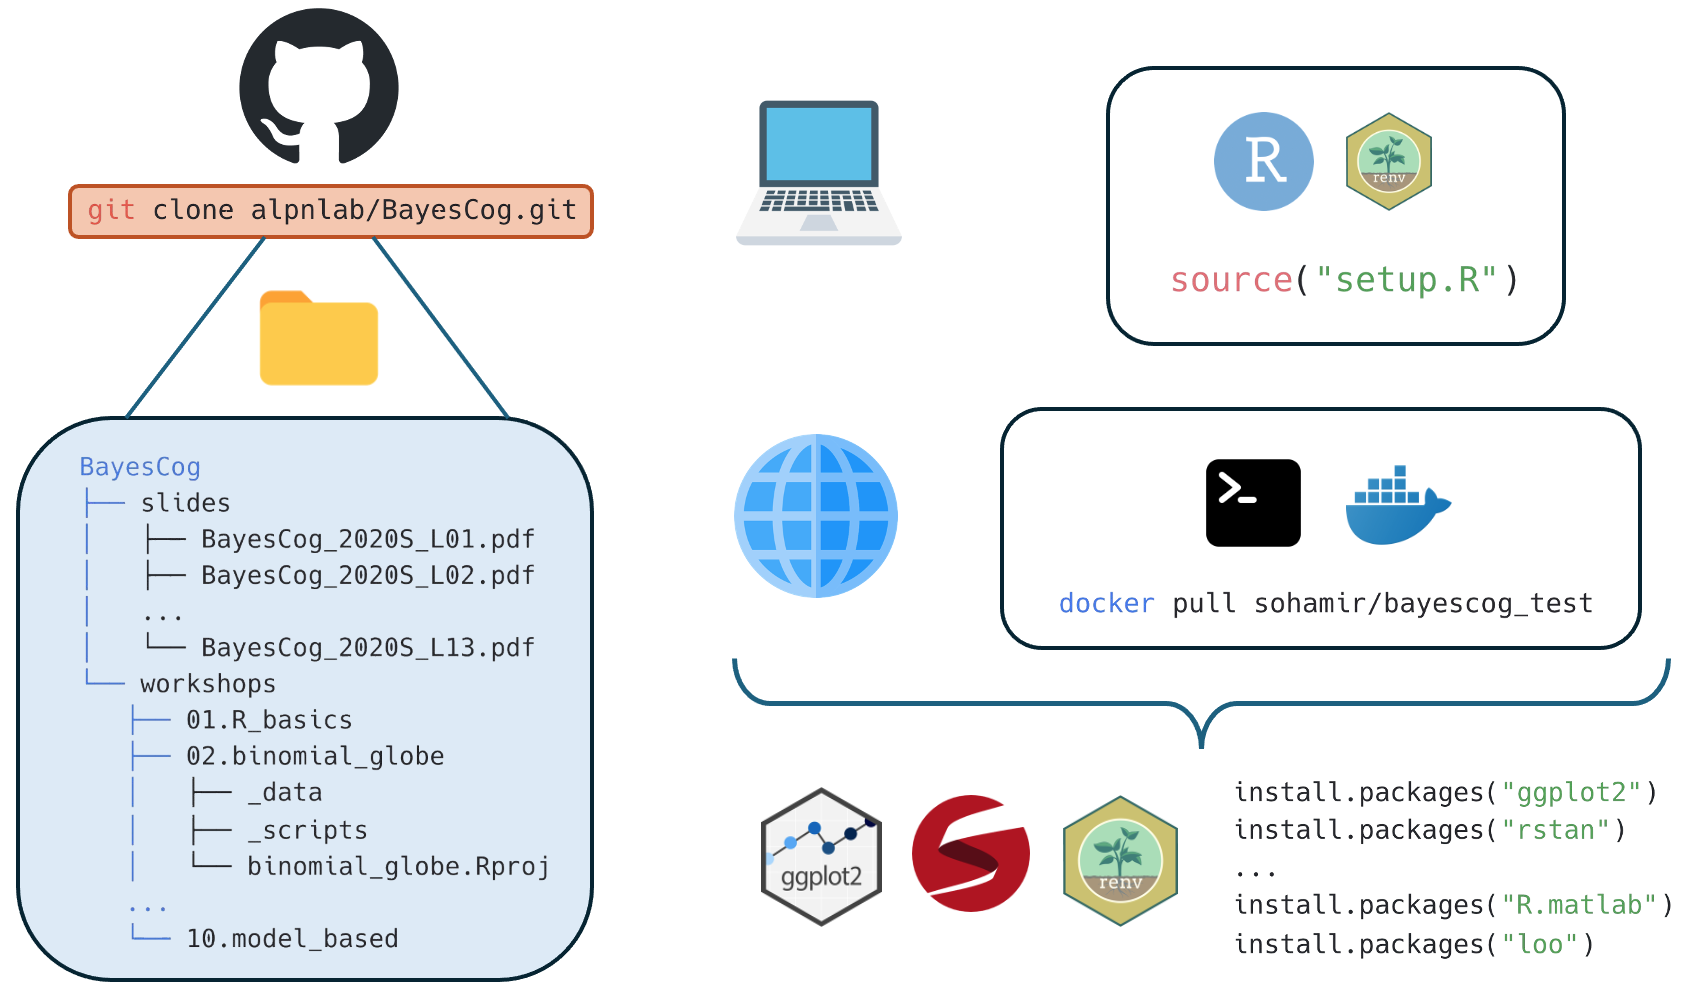
Using Docker and renv together with GitHub can reproduce environments with only a few commands!